720/730 920/930 Battery Replacement Tutorial - Discussion

btw TomTom didn't want to know about the USB connector as I am out of warranty -- they only seem to help as much as they absolutely have to it seems and they referred me to a third party repairer. I'm sure I can get the job done much cheaper and just as well as I now know it is just the connector that is my trouble (apart from the battery).
While you were inside, did you note that either the mounting tabs on the USB connector or the connections themselves had become detached from the board? Or does the problem seem to be internal to the connector?

Also, I'd be curious to know who they referred you to for repair.
 
After replacing my battery, I discovered that the in car cable was faulty. If I jiggled the socket connection at the Tom Tom end I could get a charge. Fortunately I had a new unused spare and this worked Ok. I came to the conclusion that a wire in the cable socket was broken and making an intermittent connection. The replacement cable appeared more robust. There was no problem with the USB connector. Maybe I did not need a new battery after all!
If you suspect the battery it is worth checking that the word ?Charging? appears under the battery indicator when connected to either charging source before replacing the battery (I did not).
You may find Velcro too thick. I used double sided Sellotape.
I gave the new battery two full charge/discharge cycles and get 1.75 hours life at full use.
 
After replacing my battery, I discovered that the in car cable was faulty.
Had exactly the same thing happen, Mike. I recently posted the note below in the "GO 720 Charging" thread. However, I wasn't fooled with regard to my battery - the little green light on my 720 wasn't lit, indicating a no-power situation. No problems when in the docking station at home, and no problem with the 2nd cord.

--------------------
I have experienced this problem personally. Based upon experience with one of my own products, I assumed that it would be the USB connector inside the unit itself. Yanking the cord (or dropping the unit from the mount and having it yanked that way) is a quick way to loosen it from the board.

Disassembled my unit, and was surprised to see not only the circuit traces all happy, but the four mounting lugs on the USB connector solidly connected to the board - all solder intact.

Turns out it WAS my power cable. The cable in my other car exhibited no such problems. I reformed the connector on the power cable and it worked better for a bit, but obviously the contacts inside were no longer servicing the USB connector on the unit. Cut off the R/A connector and soldered on another one. Problem solved.

In my case, I had to press the connector toward the rear of the unit to get decent contact - before I replaced it, that is.
 
I forgot to say that with the old cable, the green light was always on when plugged to either charging method.
I jiggled the old cable plug towards the screen to charge the battery
 
Last edited:
Hey all..

I finally got around to changing my battery, since it gives a whopping five-ten minutes of battery time on a full charge after a couple of years.

I've been using canderson's excellent documentation on how to open my 930 for battery replacement, but I've hit a snag: the battery is dead stuck to the PCB and no amount of prying will budge it. I don't have plastic tools that are sturdy enough to withstand the force needed to budge the battery, and I want to avoid using chemicals on the PCB.
I figured I might be able to get the battery cell out of the wrapping plastic, but as the "cover flap" of the wrap is facing downwards into the adhesive, I'm not getting at it. So I've carefully cut around the edge of the battery and removed the top of the wrapping plastic, however that really didn't help much as the plastic itself is adhesive and keeps the battery cell in place.

I'm thinking it will be better to mount the new battery on the back of the unit (like TomTom now does in the 940) instead of on the PCB, using a doublesided sticky pad, any thoughts on that?

But of course, my primary problem is that I'm not getting the old battery out of there by any means available to me. I read a suggestion about a thin screwdriver but that sounds potentially very harmful to the unit. How about acetone to dissolve the adhesive - that shouldn't need post-operation cleanup like the WD-40 (asking as I don't have electrical contact cleaner), right?

At this point, any suggestions are welcome. The battery is still stuck to the PCB, but has no plastic wrapping on the "top" side of the battery.
 
Spray the WD40 in to a top of the can plastic top then use a cottonwool ear bud to put small amounts of the WD40 around the edge of the battery, leave it for 15 to 20 minutes, if the battery is still tight on the PCB add some more WD40, the one I changed last Friday took a while for the WD40 to do its trick (about an hour) but the battery came out and it was stuck to the PCB really well making removal rather difficult!

When you get the battery out simply clean the PCB with kitchen roll/ tissue before sticking the new battery in with a small blob of silicon sealent, leave the device for a few hours for the silicon to cure before powering up the device - Mike
 
Yup - go with Mike's plan. Do NOT use acetone.

Acetone is capable of stripping certain kinds of solder mask right off the board. WD-40 isn't much good as a lubricant, but it's great for loosening and removing adhesive goo.

The kit that I mentioned receiving with my battery (see about a zillion posts back at the beginning) included a small plastic tool to assist. Where dd you get your battery?
 
Okay, will try with WD-40 according to Mike's directions and report back. I got the battery in Sweden, from one of two shops that sell these replacements over here. None of them provide tools with their batteries, sadly.

UPDATE: No luck so far. I've dabbed WD-40 onto the battery as Mike suggested, and so far I've let it sit for a good half hour, adding more WD-40 every now and then. The glue is as sticky as ever, no chance of budging the battery more than a millimeter or so without bending the PCB. I'll wait some more... and, well, the battery seems to be a bit further along now, but that's mostly because it's bent out of shape... (which feels a bit risky considering the "my battery exploded" post as well as the reputed unstableness of Li-Poly chemistry if the cells are punctured).
 
Last edited:
Okay, will try with WD-40 according to Mike's directions and report back. I got the battery in Sweden, from one of two shops that sell these replacements over here. None of them provide tools with their batteries, sadly.

UPDATE: No luck so far. I've dabbed WD-40 onto the battery as Mike suggested, and so far I've let it sit for a good half hour, adding more WD-40 every now and then. The glue is as sticky as ever, no chance of budging the battery more than a millimeter or so without bending the PCB. I'll wait some more... and, well, the battery seems to be a bit further along now, but that's mostly because it's bent out of shape... (which feels a bit risky considering the "my battery exploded" post as well as the reputed unstableness of Li-Poly chemistry if the cells are punctured).

I recently changed my battery and experienced the same frustration as you are. My battery came with small tools and a plastic pry bar that eventually did the trick. You need to take your time and accept the fact that it's going to take 15-20 minutes of slowly prying up around at least three sides to eventually get it to a point you can get a finger or two under it to lift/peel it off. I tried cutting the plastic wrapper off as others have and made the mistake of then prying under the battery with the tiny screwdriver in the tool kit....bad idea. Apparently I pierced the battery and a white hot burning point of light suddenly appeared with smoke curling up. I froze and stopped breathing for about 3 minutes. I stopped messing with the inside of the wrapping and went back to the bottom side with the plastic pry bar and eventually the battery pack lifts off enough for you to grab it and pull it off....gently as to not bend the PCB too much.

By the way my thanks to those who made the instructions and pictures available...excellent...however I used the method suggested by others where you do not disconnect the ribbon cable or speaker wire and believe that's the less complicated way to go.

VR
 
Last edited:
There are some somewhat more aggressive solvents you could use that would not have any chance of damaging the board, but I don't know exactly what you have in your personal inventory.

If you had access to something we here in the States call "Goof-Off", that's a good adhesive remover. What kinds of things do you have around?

I'm surprised the WD-40 isn't getting the job done. I wonder if they've used different adhesives in the 720 from time to time?

As for tools -- you can buy really CHEAP plastic "putty knives" here in the U.S. It's a disposable version of a metal one. They come as narrow as 1" here. That might be a good tool to work the battery with.

As far as solvents go, I think acetone and WD-40 are the only ones I have around - the limits of my uses are normally just getting rid of tape residue from glass surfaces, where acetone works wonders. But I understand acetone is too agressive for this job.

This is a 930 I'm working with. This adhesive is crazy strong, it seems. At least in the 940 I understand they had the good taste to stick the battery to the back of the case instead of directly on the PCB. I'm thinking maybe that's the idea behind why these replacement batteries for the x30 series has a longer cord - to allow for better placement not on the PCB.

A putty knife, well that's certainly an idea. Will have to check my local hardware store for that. I'll have to leave the unit overnight now, will give it some more WD-40 and hope things are looking better in the morning.

UPDATE: After several hours of soaking and a LOT of WD-40, and a good half hour total effective time of carefully prying with a plastic butter knife, the battery is finally removed. Cleaned off the PCB using dry paper towels, but I'm not too thrilled about the oily residue left by the WD-40, which seems to have drawn in under pieces of tape and out onto the more populated parts of the PCB. Will let the board sit and dry for the rest of the day before installing and charging the new battery to see if the thing still works, and keeping my fingers crossed that I'm not starting a fire or frying anything on the board by doing so...

UPDATE 2: Okay, everything reassembled and the charging light is on, so things are looking good. I'll let the device charge until tomorrow after work to make sure the battery has got a good initial charge. I'll report back on how it works after this (somewhat nerve-racking and messy) surgery..
 
Last edited:
Thanks everyone for the tips and pointers - the battery is now changed and charged, and it discharges far more slowly than the old one did. My 930 is back in business and no longer restricted to the car. Sweet!
 
Broken Flex Circuit Latch---Help needed

These insructions are great but I broken the little brown latch that holds the flex circuit into its socket. Does anyone know where I can get a replacement. I've tried everywhere I can think of and no luck. I can't figure a way to reassemble without it...Thanks!
 
These insructions are great but I broken the little brown latch that holds the flex circuit into its socket.
Are you certain that you've broken it? A little muscle can accidentally remove it, but it can be reattached if that was all that happened. Is whole piece off, or is it now in two pieces?
 
Ouch - no way to maintain compression on the flex cable when that happens.

You'd need a bit of vision assistance and some good fingers to remove, superglue (if it holds to the plastic involved) and replace the latch. It come assembled on the connector from the factory, and you do NOT want to get involved with removing and replacing the surface mount connector assembly.

I wish I could see how much of the latch is broken off and whether the remainder of what is there would keep the flex clamped in place if it were held down by other means. I envision a one-time-never-to-be-removed-again sort of fix where, if enough remains, the assembly with flex installed is glued and clamped in place (so that the remaining clamp compresses the flex against the connector pins) for a bit until the glue dries. You'd need to have the unit powered so that you could test to assure the connection was being made while clamped together. The clamping itself would be quite a trick.

Not sure I can provide a best answer without seeing the thing. Do you have a digital camera with a good macro ("flower") mode and a bright light so that you could take a shot of the "remains"?
 
All,

I just replaced the battery in my 720 using this method, perfect.

One caveat as has been mentioned. It is possible for the latch for the flex connector to come off. Don't panic! It it's in one piece you can reattach it. The method I just used was to install the flex 'cable' first then gently slide the latch behind the wiring and work the latch mechanism back into place. (you can see by the picture of the latch mech, that the cable goes forward of the latch.) Keep the latch in the up or unlatched position, push it down into the connector and then flatten out. If you don't get it, keep trying. This took me a good ten minutes to get right but you can tell when it's latched. I re-used the black tape that was on mine to keep it latched. I put the unit all back together and it worked! That's half the battle.

I'll see by tomorrow if the battery replacement fixed the 'turn off' problem.

Thanks for this tutorial.
Pete
 
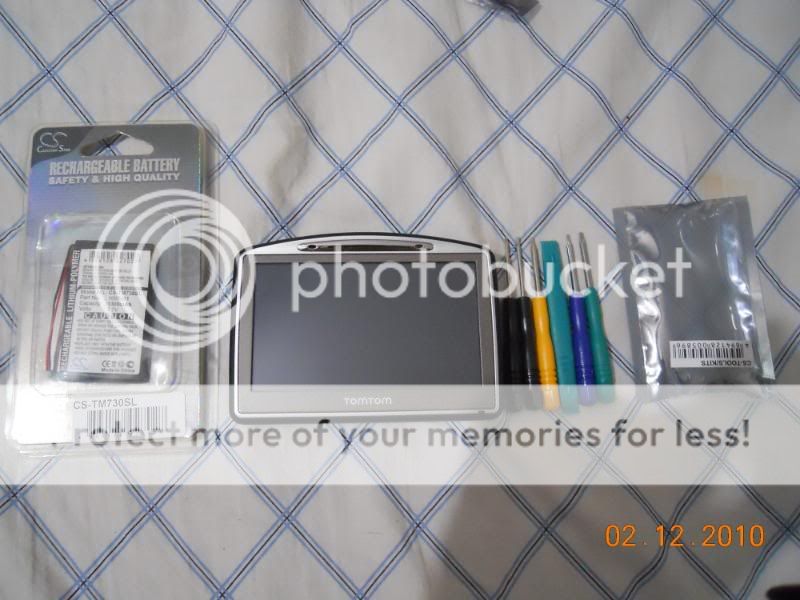
I ended up replacing my 720 battery last month and am posting up these pictures I took, based on recommendations by dhn. I am in no way stealing credit for this thread at all, but just thought I would post my pictures of my procedure to add to the thread. :)

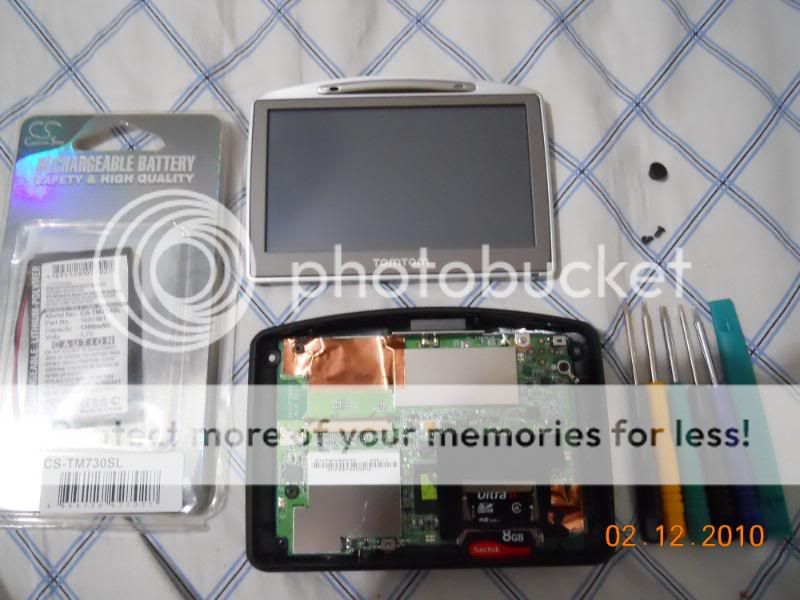
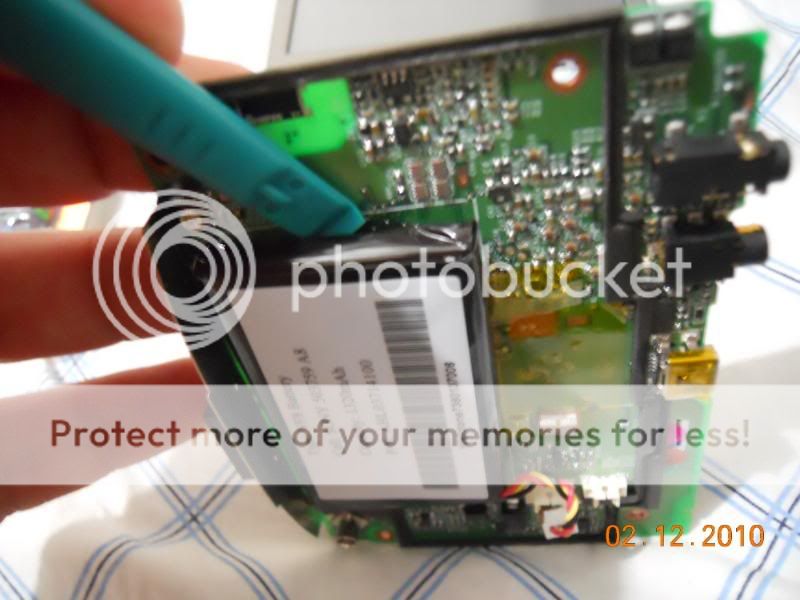
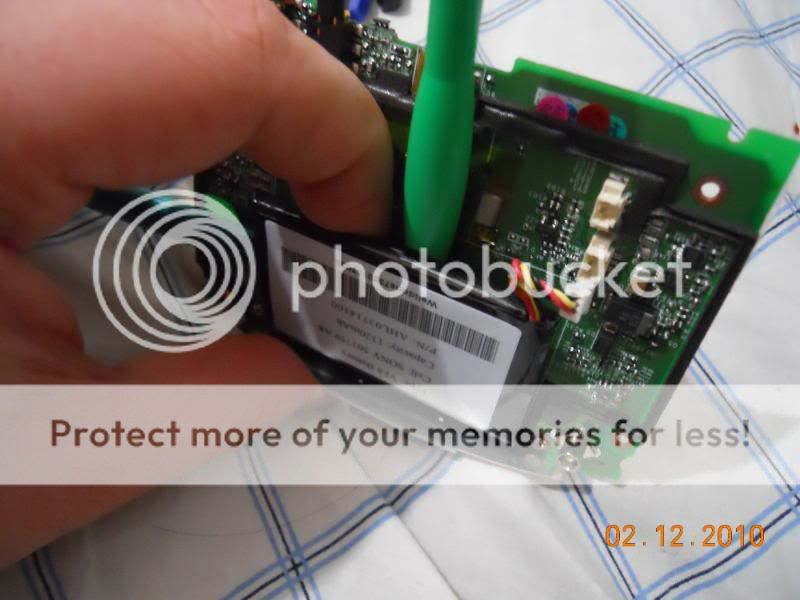
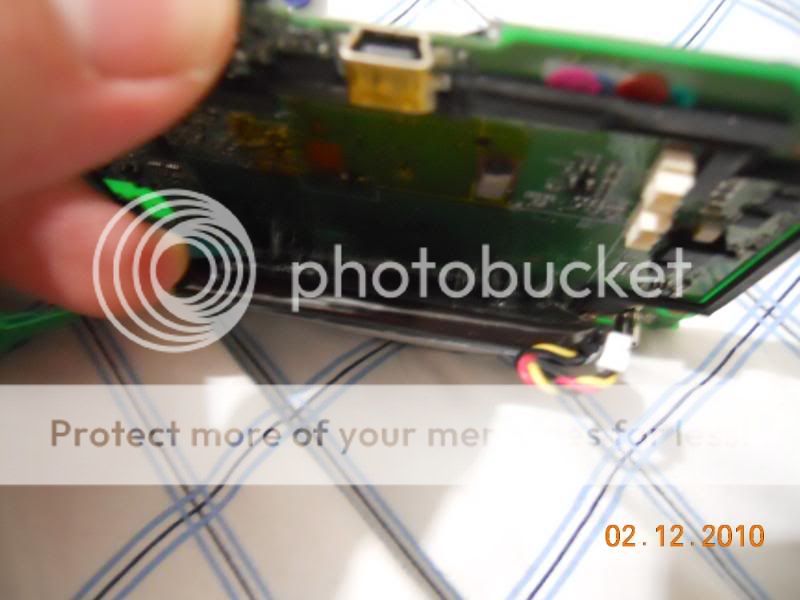
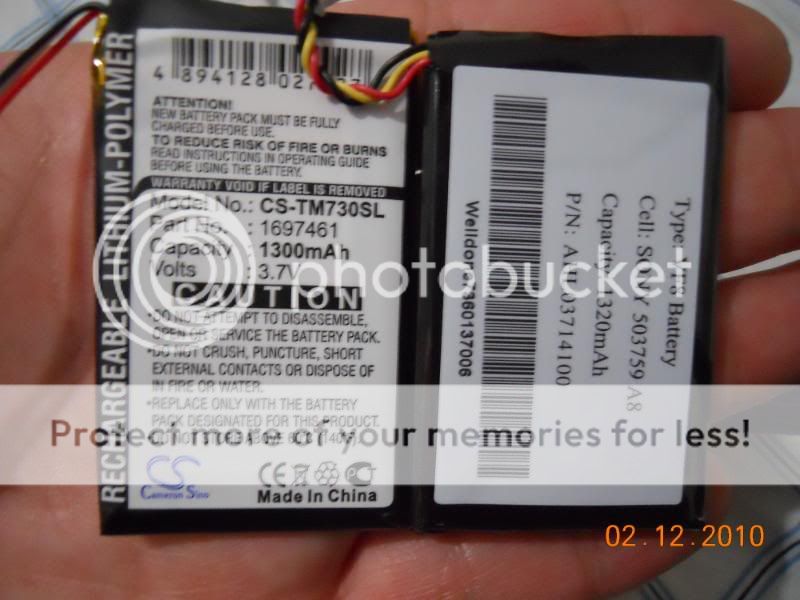
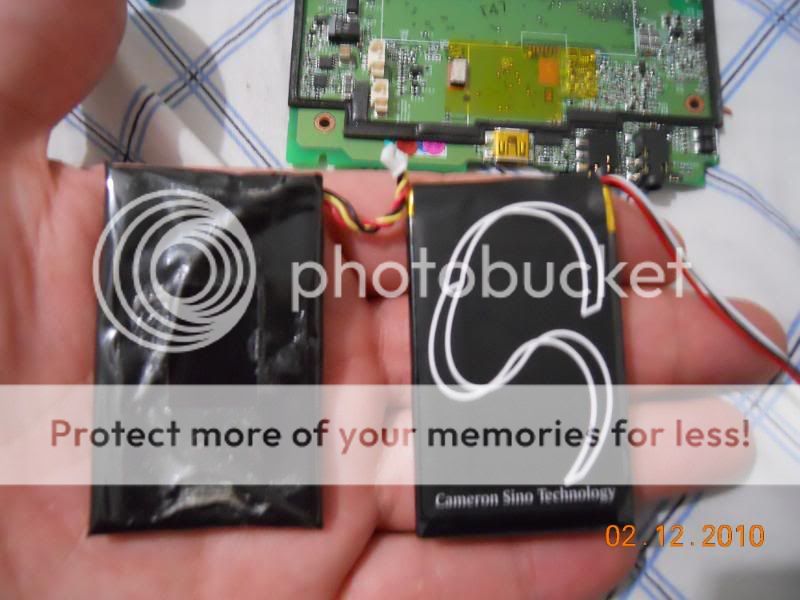
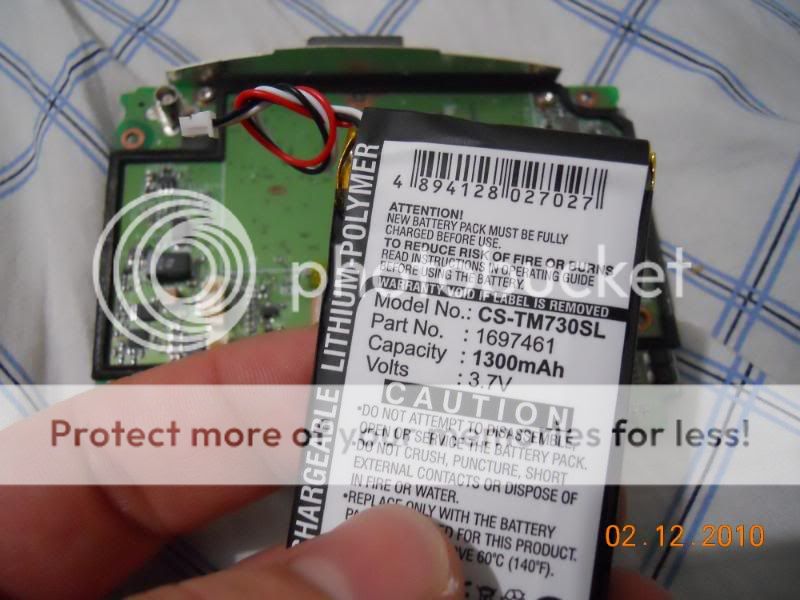
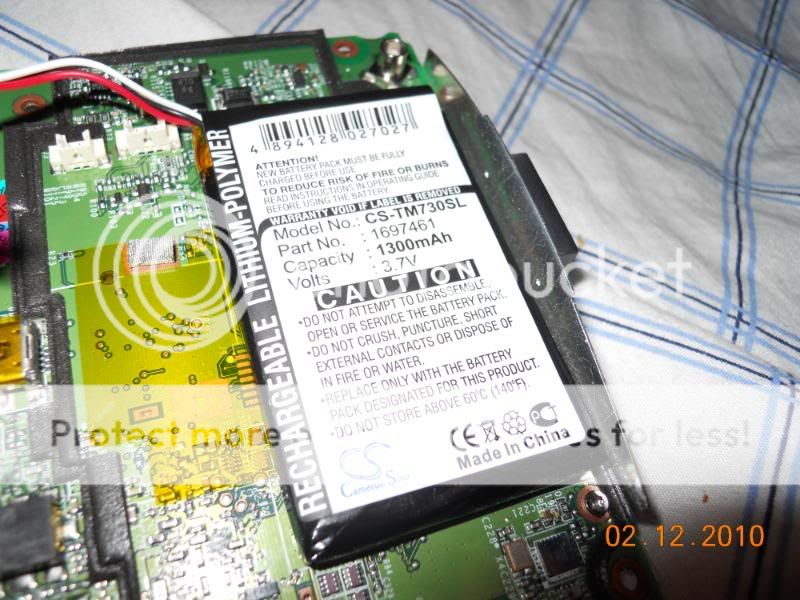
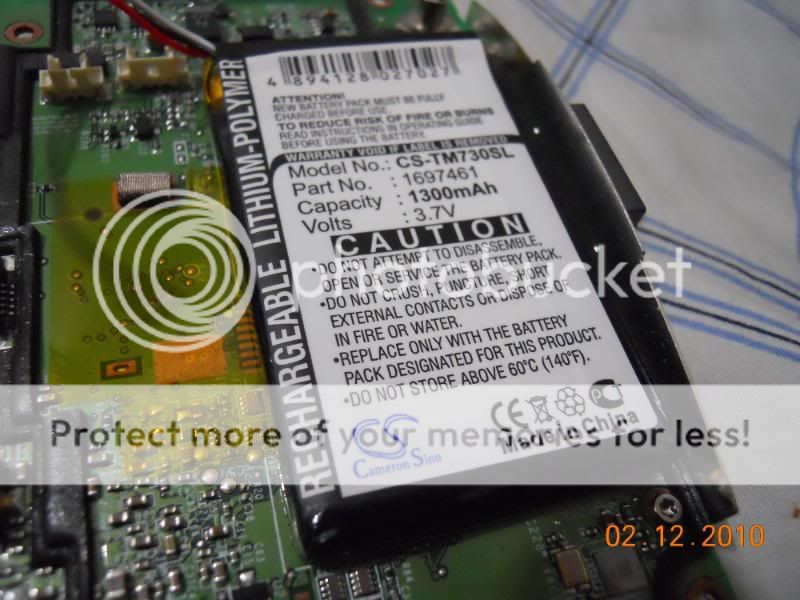
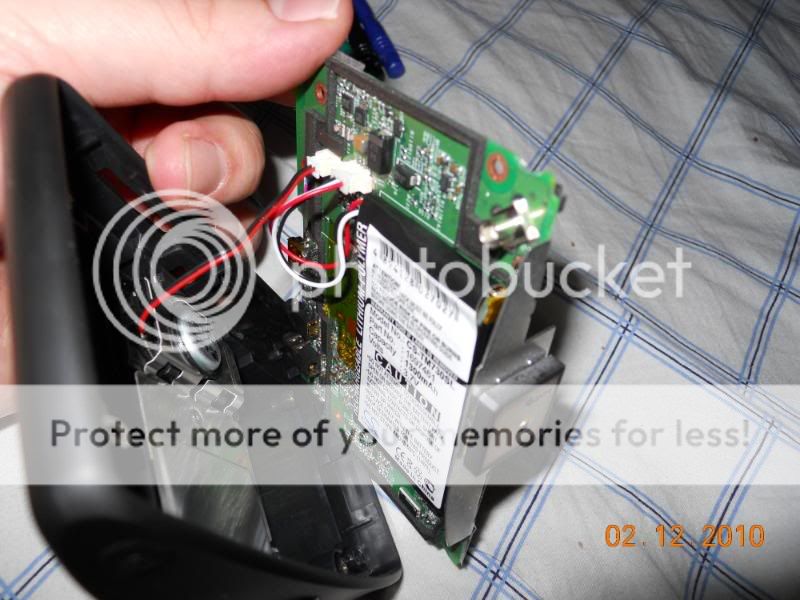
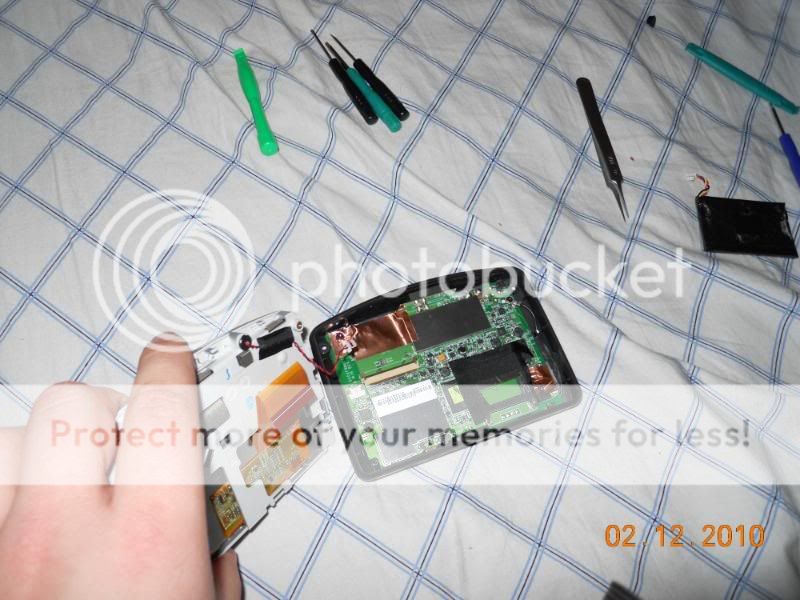
Finally decided to order the battery for real and replace it. All went well. SUPER easy! Removing the battery was very easy as well. The trick is to lift the battery up just enough so you can get your finger under it, and then slowly let it start lifting up on its own while pulling up in a super steady motion. Do NOT try to pry the battery up at once. It will slowly start coming off on its own with while keeping even pressure. It's nothing more than super super super super sticky TAPE..ish stuff. At least that's what was in my device.

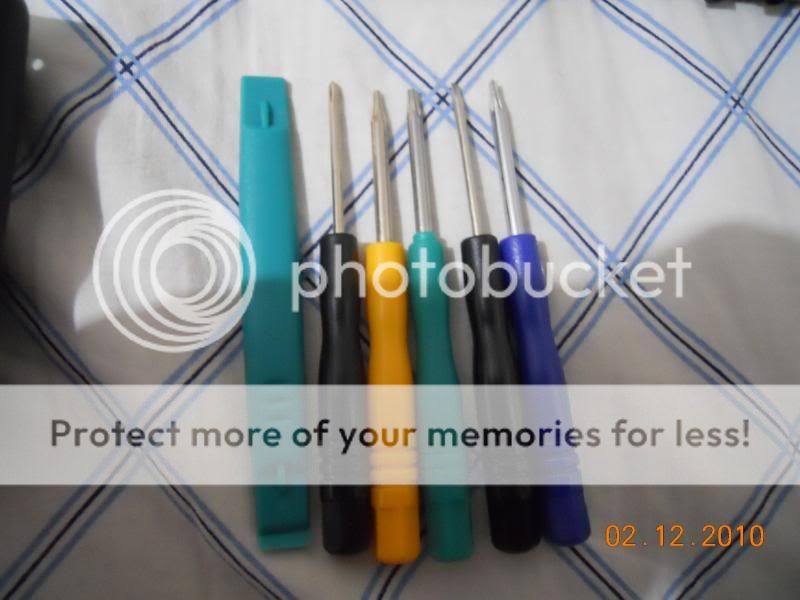
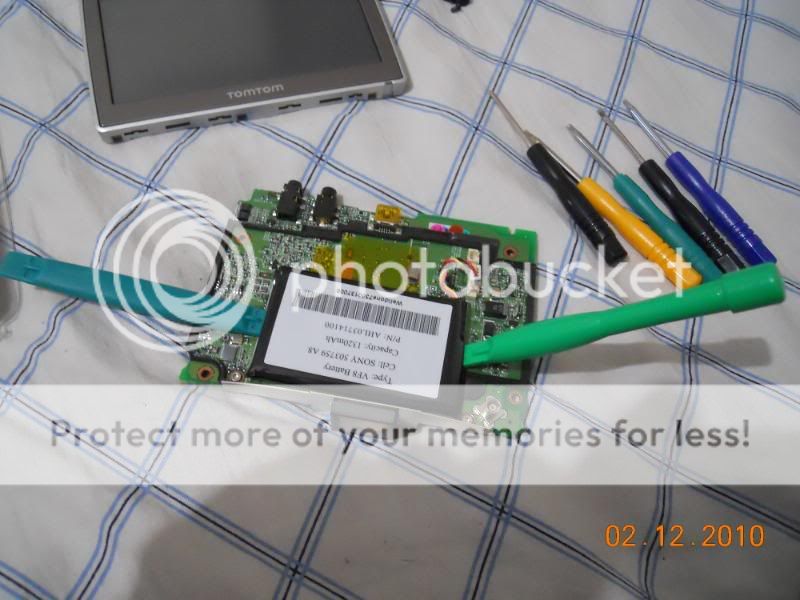
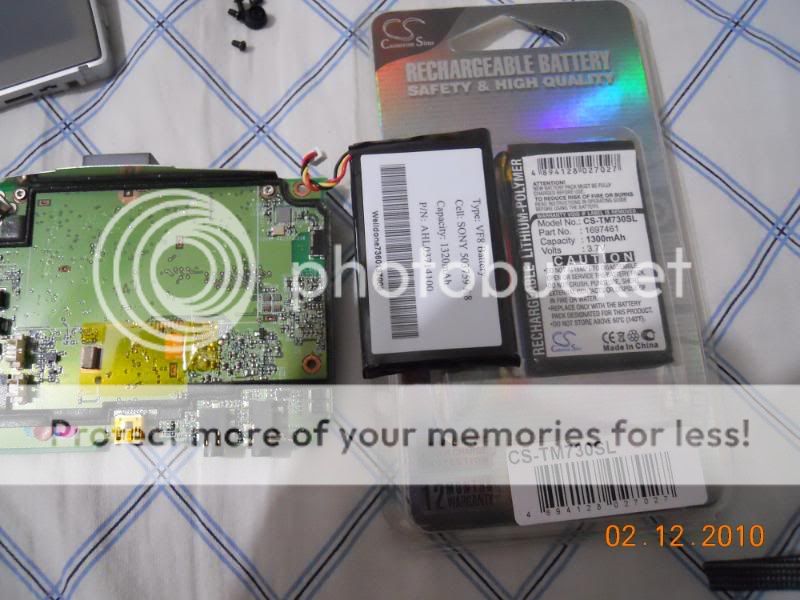
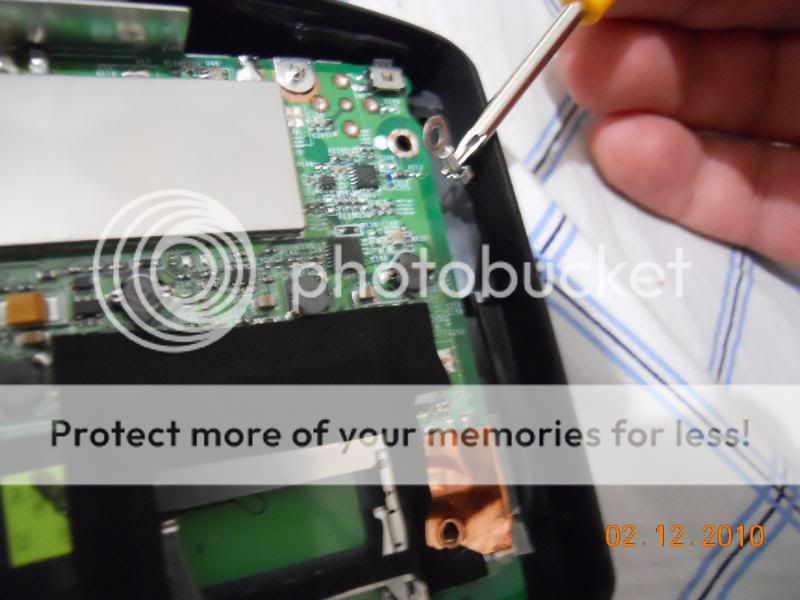
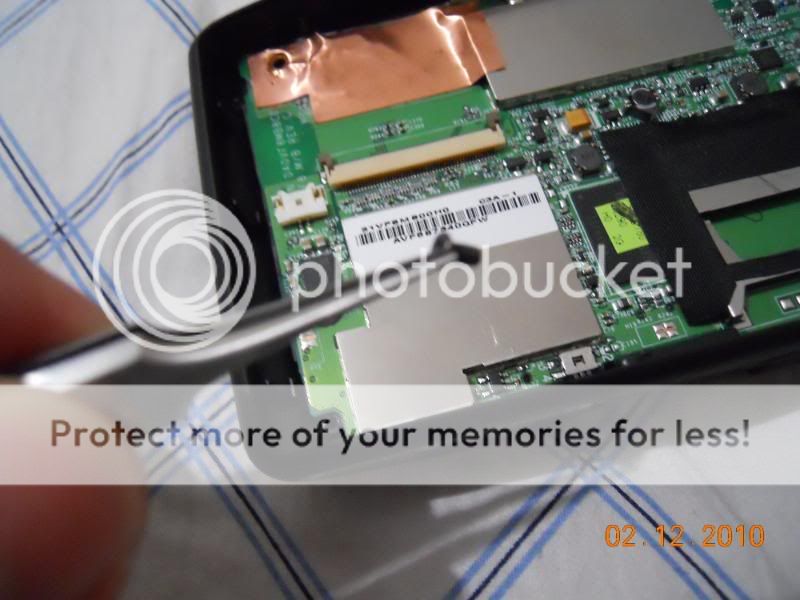
Do NOT use anything metal to remove battery. Use any hard plastic object. The battery I bought came with an entire tool kit for free! Here are the pics of the process :) and here is the link to the auction I got my battery from. 1300mAh Li-Polymer Battery w/tools for TomTom Go 720 - eBay (item 370324154424 end time Apr-21-10 20:31:11 PDT)

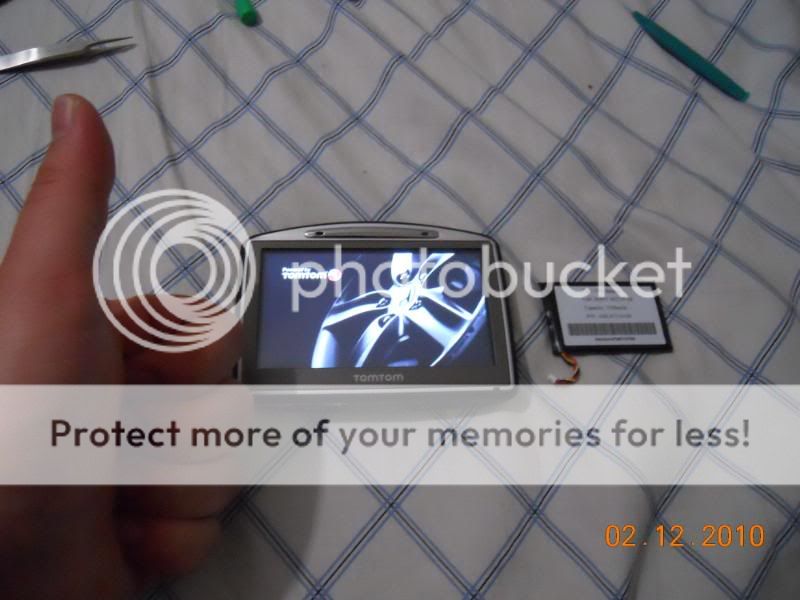
I bet this battery will last a WHOLE lot longer than when I first got my TomTom since I bought my 720 refurbished, and the original battery never did have that great of battery life. Back then, my 720 wouldn't last anymore than 2 minutes unplugged right before I replaced it. It's recommended that you fully charge and discharge the new battery about 2 or 3 times for the first charges so the battery becomes conditioned. After conditioning, I got about 3 hours of use on a full charge WHILE playing music via the FM transmitter the whole time and while driving with the TomTom. The TomTom/battery hit 4+ hours when simply sittng idle in my bedroom without any routes planned and without the device moving at all. Here are the pics!
If you have any questions, let me know! :) Sorry if the pics are too big. I can "try" to resize them even smaller but it would be a pain since there are so many. I originally took these pictures at 15 Megapixel size which made them HUGE!!!! :( If you really would like them resized then let me know.


DSCN0596.jpg


DSCN0598.jpg


DSCN0600.jpg


DSCN0602.jpg


DSCN0603.jpg


DSCN0606.jpg


DSCN0607.jpg


DSCN0608.jpg


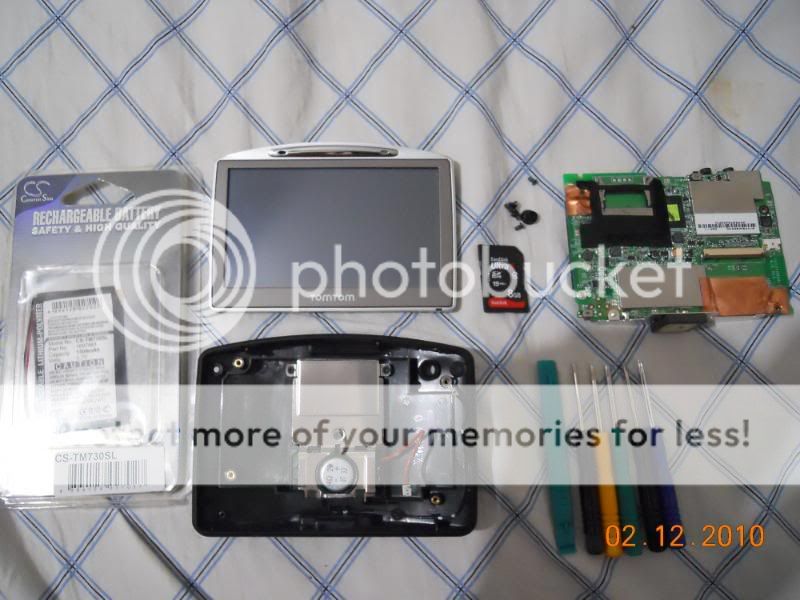
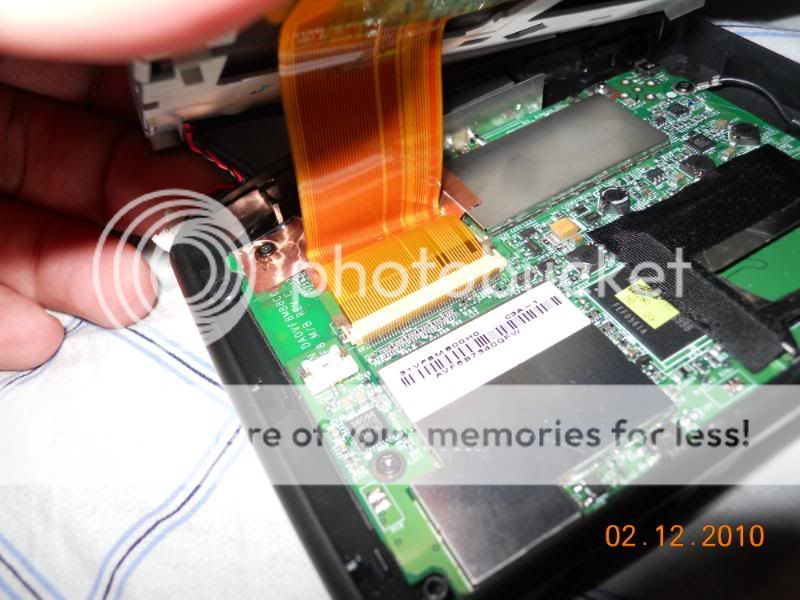
^^It is MUCH easier to pull the battery out vertically. Didn't have to bend a single thing. Again, just pry it up enough with the plastic pry tool and stick your finger under the battery and slowly let it peel itself off. ^^


DSCN0611.jpg


DSCN0612.jpg


^^Very sticky stuff, but not hard at ALL^^
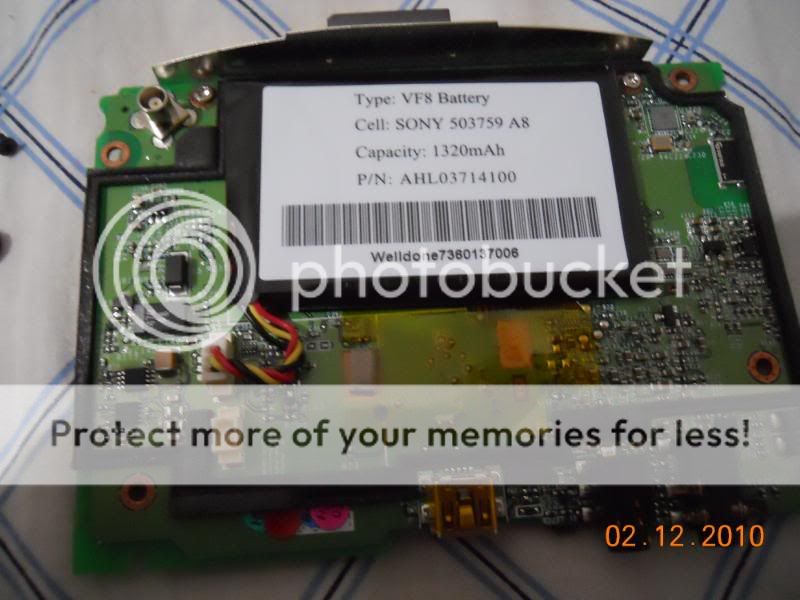
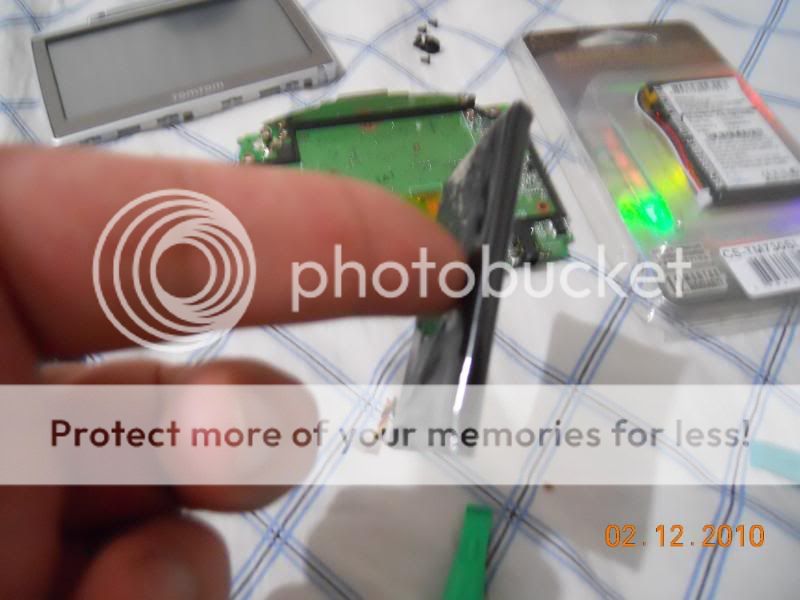
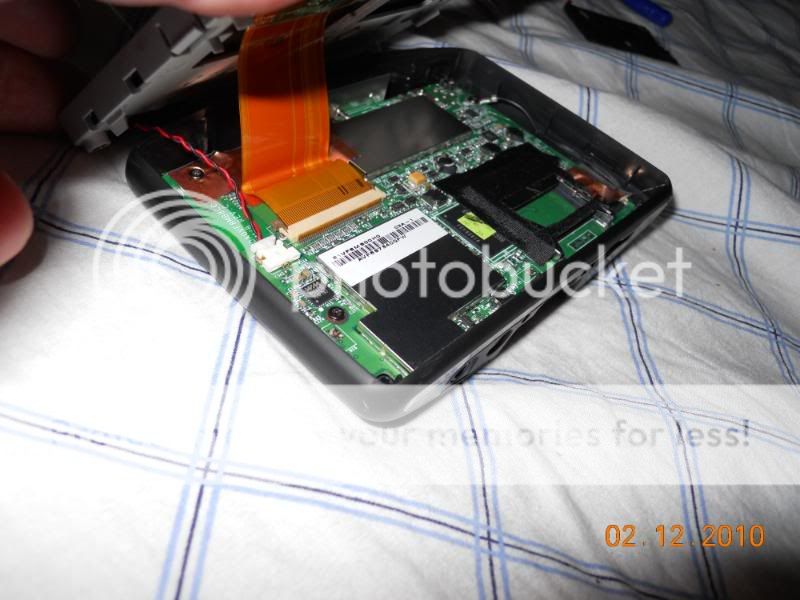
DSCN0614.jpg


DSCN0616.jpg


^Very sticky!!!^

DSCN0617.jpg


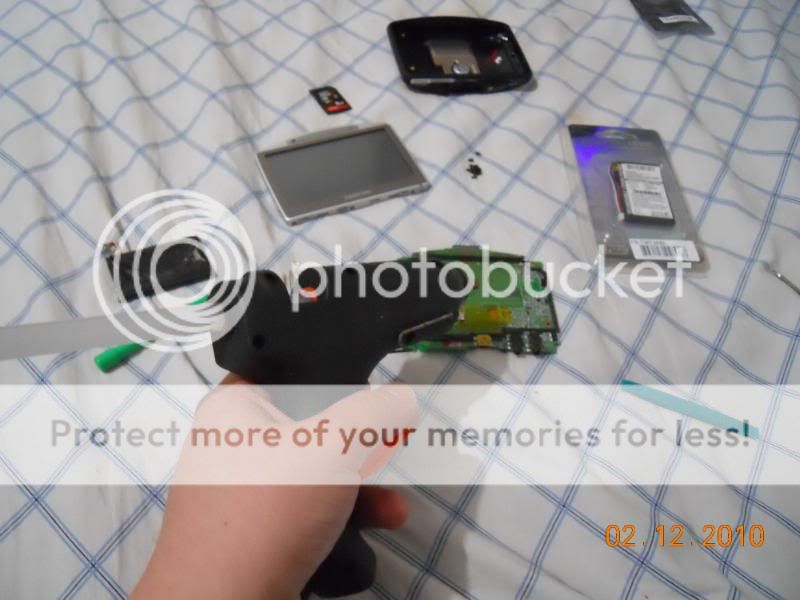
^^Heat gun to stick the new battery on^^

Post continues below on next post due to the number of picture maximum per post.
 

Ask a Question

Want to reply to this thread or ask your own question?

You'll need to choose a username for the site, which only take a couple of moments. After that, you can post your question and our members will help you out.

Ask a Question

Staff online

Members online

Latest resources

Forum statistics

Threads
28,917
Messages
195,159
Members
67,874
Latest member
gardening_diva

Latest Threads

Back
Top