Rider not charging - hard wired bike mount

spent $ for nothing

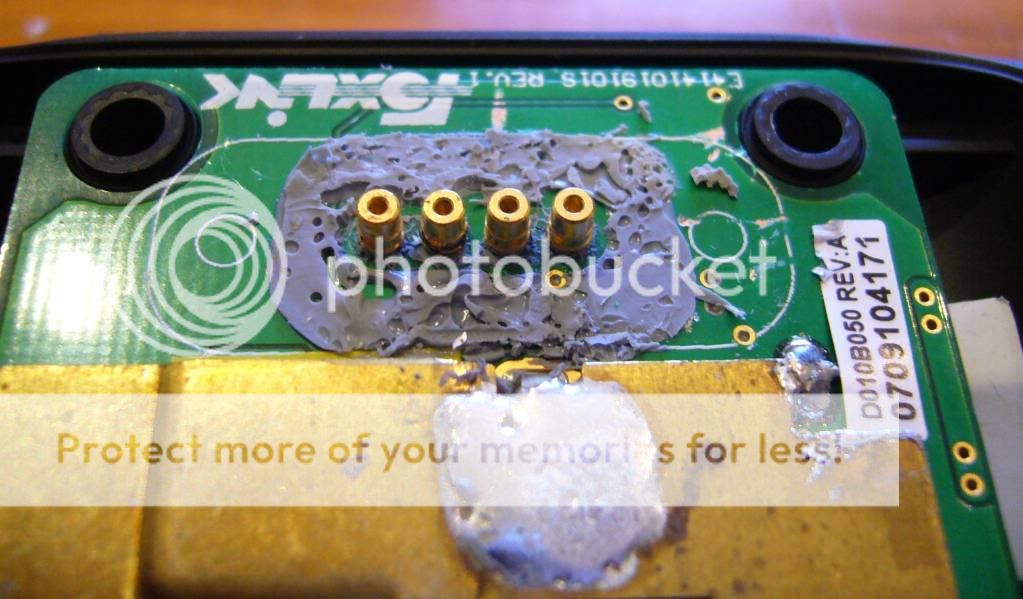
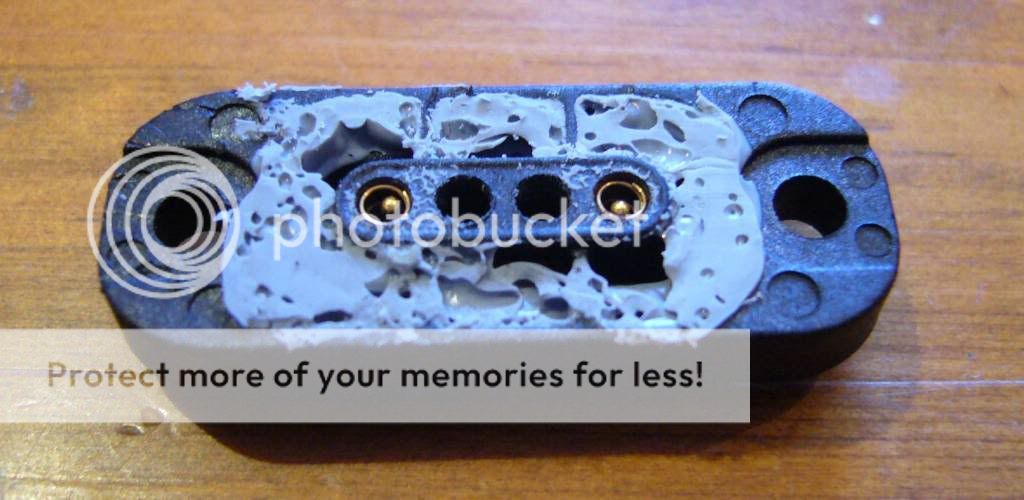
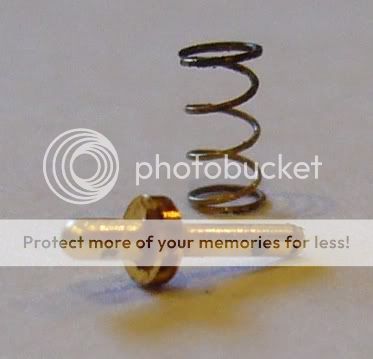
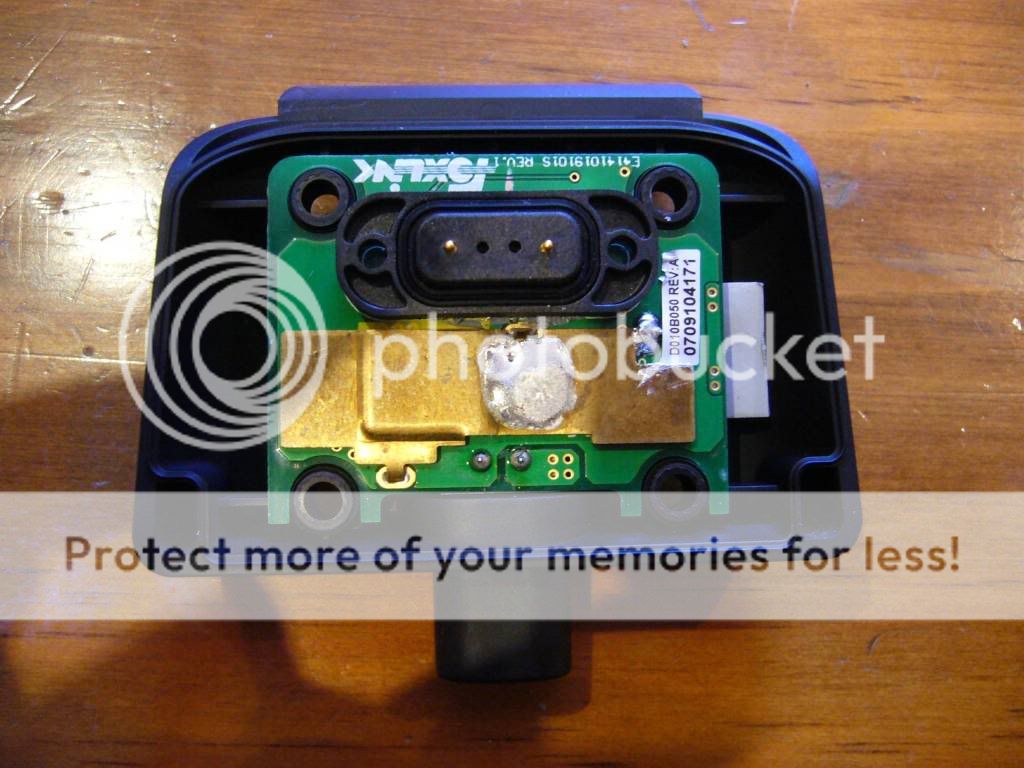
My wife got a me a tomtom rider as a xmas present when I got my spyder in December. Installed it this week and the dock doesn't work. TomTom won't help since I don't have a receipt to verify purchase date. They say from the bar code that it was manufactured in 2008. The store won't help because it's over 90 days. I'm afraid to buy another dock if I can locate one since it may not work either. I made a 76 mile run today using the internal battery and consumed half the power. This thing is useless. Had I known about the problems I wouldn't have bought it. I had a Garmin once and will never deal with tomtom again, period.
 
Failed fix

I took my dock apart and was able to verify 12 volts in and 0 volts out at the pins.....even the pins on the circuit board. My springs were gold plated and not corroded. Just poor quality control. I'm limited to the time of the on board battery. I wish others luck with their tomtoms but I am a first and last time user of their products,
 
if your TT r2 is not charging, at your vehicle;
At the first connection by wire, you may connect the wrong sides of the power cord. Because of this, the fuse of the device may burned out. İf you are capable enough, open and change the small fuse. You will need a hex key, a screwdriver and an ammeter. Open the device by your tools, then use your ammeter and check the fuse.
What if, you can not find the same fuse instead of the burned out one;
Try to solder, a very thin, mono copper wire at the two sides of the fuse.
İf your device is under the warranty or you are not capable to fix it, do not try anything.
 
Rider Mount Fix

Quick, effective fix for the mounting. Keep the stock mount just to have something to mount the rider to. Unplug the stock power cord to the bottom of the mount. At Radio Shack, or wherever, buy a power adapter (cigarette lighter plugin) that goes from the 12 VDC to 5 VDC (usually used for cd players etc). Provide 12 volt to the adapter. If your bike has a cigarette lighter, just plug it in. If not, I cut off the green TomTom plug and used that wire. Plug the 5 volt end into the bottom of the Rider by opening the door on the bottom and plug it into the small round plug. (might want to put some tape over the data card to keep it from popping out). Everything works great and no more mount problems.
Not as waterproof as the origional but fairly well protected.
 
I bought an urban rider which doesn't come with a charging mount so I bought one from TT. This didn't work so they sent a replacement which did,until now. I finally got round to fitting a 12v adapter to the cable for the car. Spent all afternoon soldering re-soldering cos I thought the wires weren't correct. Then checked with volt meter to see if there was power at the plug end, yes 12.2v. But the rider still didn't power up or show charge when switched on. Checked it on the bike and no power.

Anyone else had problems with this charging mount? Fortunately it's still under warranty but bulid quality sucks if these are going to fail after a few months.:mad:
 
I'm now on my 3rd charging mount. Just received it and yes it works. But for how long I don't know. The last one only worked for a couple of months.
Like people have said, poor quality control. But what do you expect with something made in China. It's like their food. You always want some more 5 mins later, never fulfilling first time.:D
 
TomTom Rider Mount

I had problems with the tt mount not charging the unit, it was sent back and replaced a few times but it always stopped charging when on the move.

My solution:
1) Cut a slot in an allen key to undo screws on the TT mount.
2) Remove screws and remove rubber seal.
3) In place of rubber seal use silicon sealant around the unit including screw holes.
4) Replace screws and remount unit.

It will now work perfectly as this method allows the pins to extend further out of the mount allowing them to reach the tt unit properly.

Happy Riding John
 
I'd like to try your fix for this apparently common problem but i'm having trouble getting the unit apart. I've taken the unit off the bike, removed the springs and used needle nose pliers to remove the security bit allen screws. i can't seem to reach the back screws though and I can't figure out how to get the hinge area to come apart. Any thoughts?

Go to any electronics store and buy a set of allen wrenches with the hollow tip. Those are the ones you need to take that thing apart.

FYI, I'm having the same problem as everyone else is having on this forum. It won't charge on the dock. Here is what I did to verify that the bike dock is a POS:

1) Took the unit apart
2) measured resistance between 12V input pins and solder point on the board (no resistance so problem not there)
3) measured resistance between gold pins and solder points on PCB (no resistance so problem not there)
4) plugged the car charger in (same basic design as the bike mount except it has a speaker on the back) and measured voltage on all 4 pins. Contrary to what some posters are saying, I'm not seeing a 5V potential between the outer pins so I'm a bit confused. All I see is maybe 1V. And this is on the working unit. I was thinking of just using a voltage regulator to step down from 12V to 5V but that won't work. There is something going on in there that doesn't meet the eye.
5) did the same measurements on the broken unit and I'm seeing nothing. Not even the 1V potential. So the problem is on the circuit board somewhere.

So now I'm inclined to think there may be a burnt fuse in there somewhere as one of the posters suggested. I'm gonna check that out tonight.

Bottom line is the dock is garbage. A product that has no moving parts that can't even last 2 years to me is a POS. Suffices to say, this is the last time I buy Tomtom.
 
I'd like to try your fix for this apparently common problem but i'm having trouble getting the unit apart. I've taken the unit off the bike, removed the springs and used needle nose pliers to remove the security bit allen screws. i can't seem to reach the back screws though and I can't figure out how to get the hinge area to come apart. Any thoughts?

There are 2 pins in the hinge. You force them towards the outside of the unit. It's not a fun feat and will most likely cause a bit of damage, but not enough to not allow it to go back together. I think I used a small screwdriver in the gap and just kept at it.
 
I have had endless problems with rider V2 charging from bike also. Have had units replaced under warranty but now warranty expired Tom tom not interested. Would never buy any more stuff from Tomtom.
any way might have found a simple solution, sort of lines up with John's suggestion above. I just put a few strips of duck tape on the tom tom where it slides into the mount. This pushes the unit nearer the connectors. Worked on both bike mounts I have. good luck, but base problem is Tom Tom have produced product not fit for purpose.
Cheers
Chris
 
That's not really a solution to the problem here, mike. The Rider has pin contacts to supply the power from the Rider mounting cradle to the Rider itself, and it's THOSE that fail.
 
Pins voltage

Does anyone know the correct voltage between the pins of the TT rider?
please help us on this topic

(Edited to remove quote of entirety of post #30)
 
Last edited by a moderator:
Not exactly, but I believe the wired-in power supply on the bike reduces the battery 12V down to around 5V just like every other TomTom power supply, so it will be around 5V.
 
Eliminate the dock completely. They are junk to start with and will not get better. Instead, get a hardwire 12vdc to 5vdc untit from EDO Tech (http://www.amazon.com/gp/aag/main?i...=ATVPDKIKX0DER&orderID=&seller=A1OUIPALIZF263) Wire this up to you accessory circuit (fused) and plug the output into the same port that the in-home charger uses. Works like a dream. I've been using this for four years after three docks crashed on me and never once failed.
 
I finished hard wiring the mount to find that the Rider would not charge. I have power to the end of the plug that goes into the bike mount and the connections on the back of the TT look nice and clean.

A little digging this evening came up with a potential anwer from a site reviewing the TT rider:


"Dumb" Biker Mode (officially called Drive Mode)

This mode is activated when you place the Rider in its cradle on the motorcycle and start riding. The Rider is assuming it's on a motorcycle, and disables all functions apart from standard navigating.

No Battery Charging While Riding


Due to the complexity of their "Drive Mode", you can't charge the GPS Rider on a motorcycle without it moving into Drive Mode.


I have not had a chance to hook it up and go for a ride to see if this changes anything, Has anyone else had any difficulty in getting the TT to charge when hard wired to the bike? It works fine otherwise.

TM
 
Fix Your Tomtom Rider 2 Docking Station

Great Post Alcapone - you helped me save $170 Au as TT would not replace my charger (2 mths out of warranty)...

NOTE TO ALL: If in warranty, CLAIM at first sign of trouble (it will break)...

Some pics for Alcapones notes...


To do this I opened the gap between the housing by jamming a few coins in-between the moving parts. I used a hack saw blade to cut the pin with minimal damage to the plastic. Note: there are 2 pins (not 1 going all the way through...)


Don't worry about cutting thru the connectors - they are quite robust. I attacked from the accessible side and then the ends eventually prising off with a small screw driver...

BoardwoConnector.jpg


connectorass.jpg


Same - except my springs seem to be gold plated.... still it died... one of the pins was quite badly corroded as well... (TT must be using a 2nd rate kinda gold...)

Connector.jpg


As far as I am aware they are to tell the TTR2 that it is docked in the bike charger... I removed the middle 2 pins and used them for the power. This means I had 2 holes to plug...


Before you put it together make sure you have the pins the right way around... I put them in backwards on my 1st attempt and one of the springs got stuck and is now FUBAR (stretched such that it is no longer a spring).

Short end of the pin makes contact with TT - long end of pin has spring around it and makes contact with charger... (at least this is what worked for me...)

Assembled.jpg
Thanks for the explaination! Old posts are handy for old pieces of equipment!
Maybe this can be of help for people still using the TT Rider v2 : mine stoped charging after a gigantic bump on the Belgian motorway, actually the whole mount with ripped off in the shock, luckily no damage to hte bike and no crash... As a side note, I will never drive through Belgium again. Too dangerous.
As illustrated the pins holding the lever, need to be pushed back to the outsde of the mount. I figured that to be able to get at the pin, a very wide (as wide as possible) gap would be needed. So I used a thick piece of plastic I carefully tapped in with a small hammer, to create an approx 1,5mm gap, I guess 4 or 5 strips of an expired credit card would do. I used plastic to avoid damaging the mount. This worked like a charm.
I used a thin and unbreakable knife to do the push back of the pin part. I expected this to be the difficult part, after what is said above, but it went surprisingly easy. Once the pin sticks out 1mm, I used some pliers to pull the pin out. The whole operation took less than 5 minutes.
Ordered a fuse, that looks to be OoO.
Hope this helps, before you through away your v2!
 

Ask a Question

Want to reply to this thread or ask your own question?

You'll need to choose a username for the site, which only take a couple of moments. After that, you can post your question and our members will help you out.

Ask a Question

Members online

Latest resources

Forum statistics

Threads
28,903
Messages
195,048
Members
67,856
Latest member
MadmanxJim

Latest Threads

Back
Top