740 LIVE Fixed Mount Option

Joined
Sep 3, 2009
Messages
16
Location
New Orleans
TomTom Model(s)
740 LIVE
The OEM mount is a much better design, but I also want a more permanent mount for a solid fixed dash placement in my Ram Quad Cab. I don't want a window mount and I came across this on TT accessory page (United Kingdom) country:
Active Dock for fixed installation . @ GBP 24.95, But it's apparently NOT avaiilable to United States users. I eventually found TomTom Active Dock Holder with Tilt Swivel. For Fixed Installation @ $79 - and it includes all wiring for power. I went for this to get a nice clean solid mount on my dash a bit below eye level - helping with no direct sun onscreen and still very easy to read. This also frees up the OEM mount and power cord for when I switch vehicles.

Has anyone else used this type of mount - from ProClip USA? Any thoughts on its installation is appreciated,
 
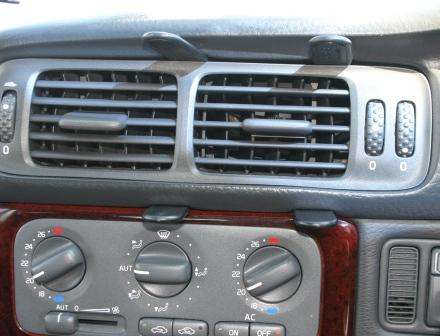
I was fitting the Brodit / TomTom holder for the 940 to my Volvo V70 but the process will be very similar for whatever car you drive. Take a look at the Brodit or DSL web sites to locate your make, model and year of car as you will still need the Brodit Pro-Clip in addition to the TomTom part. The mount for the TomTom x40 can be found on This page.


To start fitting the Pro-Clip to the car you use the supplied spacer tools to open up a gap in the vehicles trim, these are simply pushed in between the two adjacent parts.

Clean the surfaces the mount is going to be in contact with using the supplied alcohol based wipe.


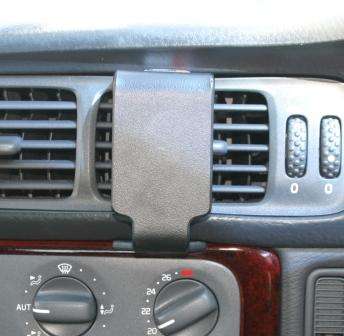
Remove the backing tape from the mount before pushing it in to the gap, remove the spacer tools and the clip is now very secure. Note this particular clip is named as an air vent style attachment Pro-Clip but it doesn?t secure to the vent at all ? don?t be put off thinking the clips secure to the flimsy vent they don?t all.


Now we have to attach the TomTom x40 Live accessory dock to the Pro-Clip, you will need to rotate the mount around to gain access to each of the four screws. The supplied screws take considerable force to start before they bite in to the plastic clip, but only tighten them lightly or you could possibly strip the threads.
Consider attaching the mount to the Pro-Clip before you fit the clip to the car as you could damage the vehicles trim should you slip while fitting the self tapping screws.


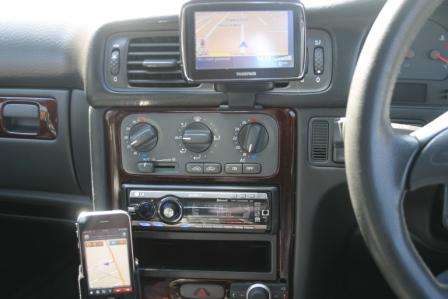
Job done, it only took around 40 minutes to fit both Brodit holders to the vehicle, no more suckers on the windscreen, a much tidier solution.


Plug the charger lead in to the car ciggy socket, insert the TomTom to the mount and away you go in the knowledge your Sat Nav isn?t going to fly around in the car the next time you hit the brakes or fall off the windscreen when you encounter pot holes.

The Brodit solution kit isn?t cheap with the mount costing nearly ?25 and the Pro-Clip a further ?15 but you get what you pay for which is a quality holder which looks like it was intended for the car, please bear in mind i am Europe based so the links within the thread are for UK/ Euro suppliers, but the details should give you an idea how to install it - Mike
 
Thanks very much, Mikealder, your photos and instructions are exactly what I needed. I now see how this setup works with the 740's powered mount! Very nice work on your part, and that is exactly what I want for my Ram.. I ordered both the mount and base to match my truck trim. Best regards.
 
Glad you like it, the Brodit kit is very easy to install and is quality kit, have a read of this which is from a Blog on the Volvo owners forum in the UK, it might offer some ideas if you want to hide the wires:

I decided I had seen enough of all those cables strewn about the car and decided to tidy it all up - Far from a small task due to the amount of wiring from the new stereo that seems to have appeared recently

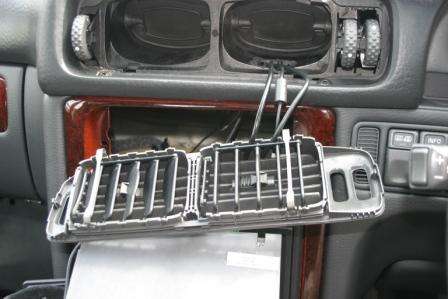
Having removed the central air vent from the car I set to with a Dremel to cut a small access hole for the cables that were going to the 940, in this case the power lead, audio line out and the RDS-TMC round style plug


The three cables are easily fed through the newly made hole, V70 owners should note the area I cut through is doubled skinned so you need to make two cuts and if you remove the Climatic Control Panel do not disconnect it or the car will throw an airbag fault.


Feeding the cables through the airvent was good fun, in the end I took the vent to bits and put the cables through where I needed them before reassembling the vent afterwards, fiddly but not impossible, the trick is to only put the power cable through one opening and the othe other two cables through an adjacent vent hole. Doing this lets the airvent still operate correctly and spreads the cables ready to connect to the 940 mount.

I pulled out the stereo to gain access to certain connections, firstly the RDS-TMC receiver needed connecting to the car aerial cable via a splitter cable I made a while ago another Blog entry will cover this cable and how to make it.


I was also fitting a three way 12V outlet socket to power the TomTom charger and iPhone power addaptor, the feeder wires to this were simply tagged to the stereo ignition switched power wires using Scotch locks.
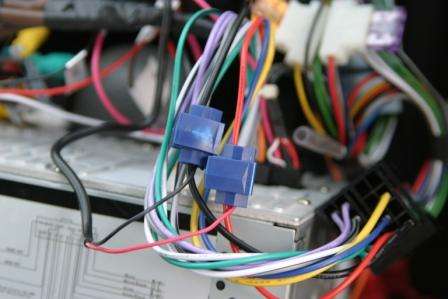

At this point its worth checking the power is working correctly so I switched it all on and got indications of charge for both the 940 and the iPhone so it was time to start tidying up.
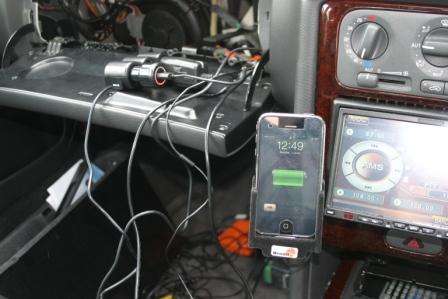

Before burying all of this I taped up the power addaptors so they couldn't migrate out of the sockets due to vibration and/ or thermal creep - easy to do just bind them together with PVC tape.
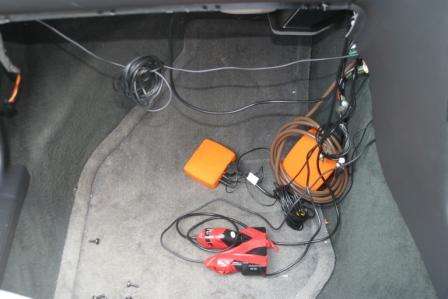

The power addaptor was then secured to the underside of the glovebox support bracket with more tape, it looks a little unsightly but once the cars back together non of this will be seen. The orange boxes are part of the iO-Play device I added to the car for decent Handsfree support, this is detailed in another blog entry (when I post it), the boxes get hidden when the trim is replaced.
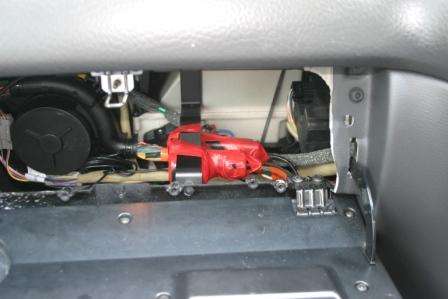

I added a new cable to the stereo during this install which adds iPOD support to the stereo, whilst I probably don't need this (yet) it saves taking the whole lot out again to add a simple cable, this is nothing to do with the TomTom but adds iPOD input to the stereo and offers full control of a device plugged in to it. I decided against using this with the iPhone as I have a Bluetooth module for that which negates the need for cables.


All cabled up and working - Oh look no wires and remember this includes an RDS-TMC receiver, much neater even though it did take a few hours.
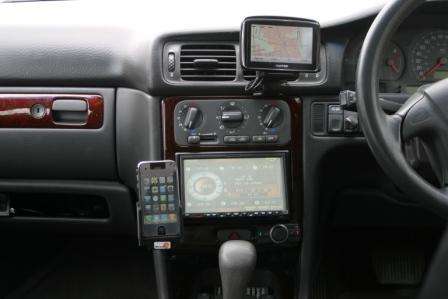

With the 940 off its bracket all that is left is a simple shoe that is pre-wired and ready to go once the device is dropped in to position.


The iPhone holder also attracts less attention as there are no tell tale wires going to it strewn all over the car.
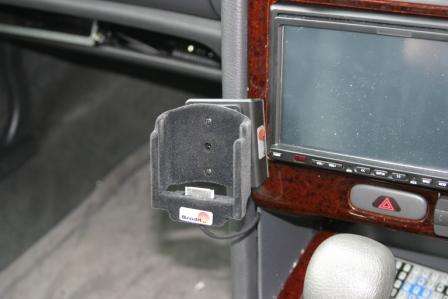

Next job is to vac out the inside of the car, bits of black plastic dust have got all over from the cutting job, but overall I am happy with the installation and the flexibility I get from the kit - Mike
 
More permanent but very similar to my vent mount. The vent mount ($15 on e-bay) works great in my Chevy Avalanche.
 
Mikealder, very nice details for us on the wiring.. my application will be similar on the 04 Ram. Both mount and bracket on order, I will post a pix of my results.. however after looking at the Ram dash bracket, I am thinking of making a custom bracket to go over the empty space below the A/C controls on my truck, between the seat heater switches. This will keep all controls in a vertical line and stil be very easy to see, out of direct sunlight.. I am thinking a center mount will work and I can run the wires, as you did, except through the space to wire into switched power ( I really like the auto power off).. I will be referring to your pix when I get my stereo bezel off to do the wiring..
 
I still get the auto power off as the stereo supply is switched by the ignition switch which is one of the reasons I chose these wires as the supply to the aux socket that I fitted to feed the TomTom and the iPhone, give yourself a full day to do the install and tidy the wiring mess up, it took me a good few hours to get the result I wanted with no wires strewn across the car, well worth it in the end though - Mike
 
Good point, I will find a switched power on the RB4 Stereo connector... Thanks for the tip, and I will also make allowances foir an IPHONE install ( as you said, I wouldnt want to pull everything apart again) but I havent ordered the mount. I will indeed save a weekend and a few beers aside for the work... . Best regards., Bill
 
Ok got my parts in and ended up doing a custom recessed mount on my Ram. Wiring is hard wired into switched dash power, so auto power off still works.
How do you attach pix?
 
Upload the picture to imageshack.com or similar (they offer free web based hoting for jpg images) then copy/ past the text for the image link to the forum text you enter on here. Use the Prieview button to make sure the image is correct before hitting the "Submit Reply" button - Mike
 
Ok here goes. Used the fixed mount and a homemade bracket that fits inside the empty space below the A/C controls.
ttdash.jpg

the mount:
ttdash3.jpg

Works well with the LCD stereo display for a clean install.
ttdash5.jpg

The IPOD install is next.
 
Last edited by a moderator:
Minor typo on the image links that were easy to sort out - Is that green snake looking thing a real one or the type of kids jelly sweet snakes they sell at the shop - well they sell em in the UK

Install looks very good though, neat job - Mike
 
Last edited:
Minor typo on the image links that were easy to sort out - Is that green snake looking thing a real one or the type of kids jelly sweet snakes they sell at the shop - well they sell em in the UK

Install looks very good though, neat job - Mike

Thanks for the assist on the pix!! I have very little glare on the screen, due to its location, so sunlight isnt a problem.. I'm very happy with the solid, wire "free" install, and more secure too. The snake - thats my swamp buddy, rubber, I'm afraid.. but my wife wont go near it... The jellies I eat!
 

Ask a Question

Want to reply to this thread or ask your own question?

You'll need to choose a username for the site, which only take a couple of moments. After that, you can post your question and our members will help you out.

Ask a Question

Members online

Latest resources

Forum statistics

Threads
28,933
Messages
195,321
Members
67,900
Latest member
Alan Baker

Latest Threads

Back
Top