You are using an out of date browser. It may not display this or other websites correctly.
You should upgrade or use an alternative browser.
You should upgrade or use an alternative browser.
Powered Car Mount? Maybe use the home dock?
- Thread starter bednorem
- Start date
By "Home dock" do you mean the USB cradle? if so, that's an intriguing idea. Many head units now come with USB ports, but I don't know enough about what exactly they do for you. I assume they could at least function to charge the GPS, but beyond that...?
I did this around two and half years ago, when I look at the pictures I no longer have the same car but its not too difficult to convert a PC Docking cradle to fit in the car untill the mother in law managed to hook it with her handbag and rip the whole lot out of the car, but I digress.....
First of all this requires "adjustment" of the supplied Home docking cradle, and the provision of some Brodit hardware.
Tools Used:
A Dremel, or small electric drill, files, screwdriver, hacksaw and a Torx bit No6.
Objective is to provide an Active powered mount for the 720 that is powered from the cars ignition, full access to the RDS-TMC/ iPOD connector and the Audio output connector. The assembly actually screws to a Brodit Pro-Clip so it will fit a number of different vehicles, I would have used a "Move It" Clip but didn't have any spare last night, I can always retro fit the Move It clip later though.

First of all you have to dismantle the Home dock, this is relatively easy:
1/ Peel back the rubber pad from the underside of the base.
2/ Remove the four Torx No6 screws securing the metal plate to the mount body.
For the Brodit Tilt/ Swivel component I used an existing part from the scrap bin, I broke my XDA-Exec Brodit holder by forcing it in the holder with an extended batter fitted - at first this worked but over time the holder snapped - there was nothing wrong with the swivel part though so I simply unscrewed it. (Note the failure of the Exec Holder was entirely my fault, but part of it now lives on).
Fabricate the bracket out of 25x25x3MM Aluminium Angle section which should be around 120MM long, holes to secure the bracket to the swivel part and the metal base plate were drilled out at 3,5MM Diameter.
Self tapping screws secure the tilt/ swivel part to the bracket while M3 screws and self locking nuts hold the bracket to the metal base plate

Mark out the metal base plate for the holes to take the RDS-TMC/ iPOD connector and Audio line out plug, I found it easier to file these into a rounded slot, the slightly larger access provided makes connection much easier.
Make sure the metal plate holes are in the correct place before re-attaching the base to the plastic body of the holder, using the metal plate as a template drill out the plastic to gain access through to where the x20 would sit.


Clean out any remaining swarf etc before fitting the x20 in to the mount and make sure the connectors can be fully located in the respective sockets, note you should turn on the x20 and connect the RDS-TMC or iPOD to make sure the connector is fully mated and the two devices are functioning - if not you might need to remove a little more material.

Fit the Pro Clip to the vehicle, and mount the x20 in to the shoe - it should look something like this:

Electrical Power
The existing Home Dock is fitted with a standard USB connector, plug this in to the ciggie socket via a USB power adaptor, I had one in the "spares box" but these can be obtained for very little cost, I might hide the wiring over the weekend and bury another socket behind the dashboard to tidy up the installation
Around two hours to make at zero cost - all that is left to do is painting the bracket which I will do later, the device sits nice and solid in the mount, even hitting speed bumps at speed does not dislodge the device (I had to try that to be sure of the units security). In position I can adjust the angle to suit my driving position and it is much easier to put on and off the mount - quite a neat looking installation - but I am sure the official Active unit from Brodit will be better - Mike
First of all this requires "adjustment" of the supplied Home docking cradle, and the provision of some Brodit hardware.
Tools Used:
A Dremel, or small electric drill, files, screwdriver, hacksaw and a Torx bit No6.
Objective is to provide an Active powered mount for the 720 that is powered from the cars ignition, full access to the RDS-TMC/ iPOD connector and the Audio output connector. The assembly actually screws to a Brodit Pro-Clip so it will fit a number of different vehicles, I would have used a "Move It" Clip but didn't have any spare last night, I can always retro fit the Move It clip later though.

First of all you have to dismantle the Home dock, this is relatively easy:
1/ Peel back the rubber pad from the underside of the base.
2/ Remove the four Torx No6 screws securing the metal plate to the mount body.
For the Brodit Tilt/ Swivel component I used an existing part from the scrap bin, I broke my XDA-Exec Brodit holder by forcing it in the holder with an extended batter fitted - at first this worked but over time the holder snapped - there was nothing wrong with the swivel part though so I simply unscrewed it. (Note the failure of the Exec Holder was entirely my fault, but part of it now lives on).
Fabricate the bracket out of 25x25x3MM Aluminium Angle section which should be around 120MM long, holes to secure the bracket to the swivel part and the metal base plate were drilled out at 3,5MM Diameter.
Self tapping screws secure the tilt/ swivel part to the bracket while M3 screws and self locking nuts hold the bracket to the metal base plate

Mark out the metal base plate for the holes to take the RDS-TMC/ iPOD connector and Audio line out plug, I found it easier to file these into a rounded slot, the slightly larger access provided makes connection much easier.
Make sure the metal plate holes are in the correct place before re-attaching the base to the plastic body of the holder, using the metal plate as a template drill out the plastic to gain access through to where the x20 would sit.


Clean out any remaining swarf etc before fitting the x20 in to the mount and make sure the connectors can be fully located in the respective sockets, note you should turn on the x20 and connect the RDS-TMC or iPOD to make sure the connector is fully mated and the two devices are functioning - if not you might need to remove a little more material.

Fit the Pro Clip to the vehicle, and mount the x20 in to the shoe - it should look something like this:

Electrical Power
The existing Home Dock is fitted with a standard USB connector, plug this in to the ciggie socket via a USB power adaptor, I had one in the "spares box" but these can be obtained for very little cost, I might hide the wiring over the weekend and bury another socket behind the dashboard to tidy up the installation
Around two hours to make at zero cost - all that is left to do is painting the bracket which I will do later, the device sits nice and solid in the mount, even hitting speed bumps at speed does not dislodge the device (I had to try that to be sure of the units security). In position I can adjust the angle to suit my driving position and it is much easier to put on and off the mount - quite a neat looking installation - but I am sure the official Active unit from Brodit will be better - Mike
Excellent tutorial, Mike. When I'm feeling ambitious enough, I may take that on. I once installed a completely new stereo system in a car (head unit, amp, speakers, hidden wiring, the works), so I guess I could handle your install. 
That car died but the Brodit clip parts live on in the new Volvo complete with some seriously hidden wiring mods to feed the sat nav units in the car, a real pet hate of mine is the speghetti strewn all over the car powering these things up, more so when you run multiple devices in the same car!
I have included the following to give you a few ideas as you could apply the same aproach to the x20 unit with a little out of the box thinking, but my current set up is as follows (although this is about to change as I want to mount the TomTom iPhone car kit on a brodit pro-clip in the car and hard wire that in, this bits I need are currently on order) - I appreciate the steering wheel is on the "wrong side" for all you American chaps but left hand drive brackets are also available:
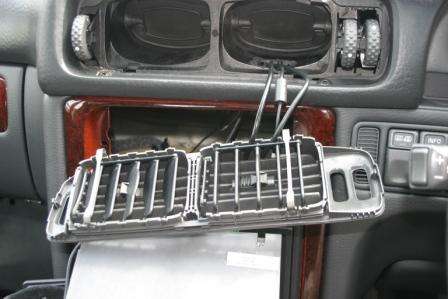
Having removed the central air vent from the car I set to with a Dremel to cut a small access hole for the cables that were going to the 940, in this case the power lead, audio line out and the RDS-TMC round style plug

The three cables are easily fed through the newly made hole, any V70 owners should note the area I cut through is doubled skinned so you need to make two cuts and if you remove the Climatic Control Panel do not disconnect it or the car will throw an airbag fault.

Feeding the cables through the airvent was good fun, in the end I took the vent to bits and put the cables through where I needed them before reassembling the vent afterwards, fiddly but not impossible, the trick is to only put the power cable through one opening and the othe other two cables through an adjacent vent hole. Doing this lets the airvent still operate correctly and spreads the cables ready to connect to the 940 mount.
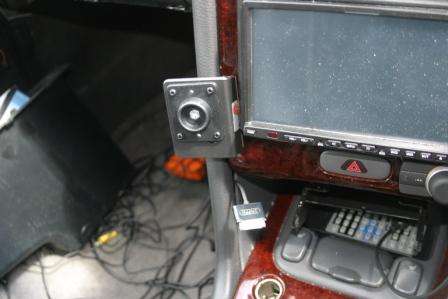
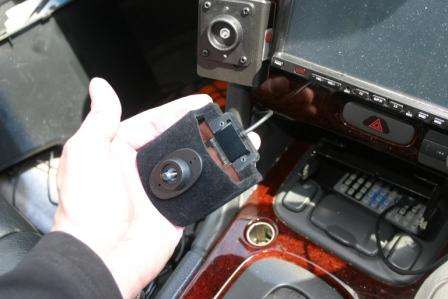
As I had most of the dash trim out of the car for access and I hate wires in the car I decided to sort out the iPhone cables at the same time, the power connector for the iPhone is easily removed from the Brodit holder by releasing the two screws on the rear of the phone holder, this makes it much easier to push the cable with connector through any available gaps in the trim.
Push the connector back in to position within the Brodit mount then resecure using the closure plate and two screws.
Resecure the Brodit Active holder to the swivel coupling by tightening the center screw, only finger tight is needed though, any more than this will snap the plastic on one part of the ball joint.

I pulled out the stereo to gain access to certain connections, firstly the RDS-TMC receiver needed connecting to the car aerial cable via a splitter cable I made a while ago (detailed in This Thread).

I was also fitting a three way 12V outlet socket to power the TomTom charger and iPhone power addaptor, the feeded wires to this were simply tagged to the stereo ignition switched power wires using Scotch locks.
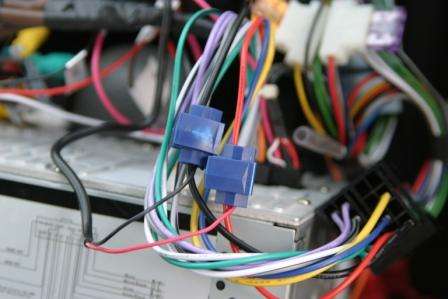
At this point its worth checking the power is working correctly so I switched it all on and got indications of charge for both the 940 and the iPhone so it was time to start tidying up.
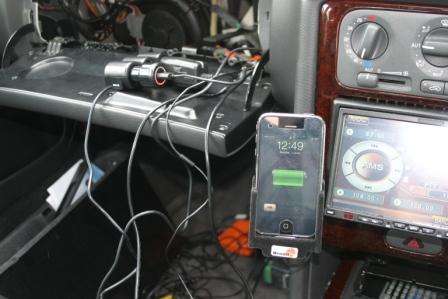
Before burying all of this I taped up the power addaptors so they couldn't migrate out of the sockets due to vibration and/ or thermal creep - easy to do just bind them together with PVC tape.
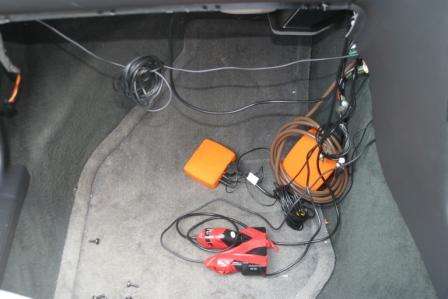
The power addaptor was then secured to the underside of the glovebox support bracket with more tape, it looks a little unsightly but once the cars back together non of this will be seen. The orange boxes are part of the iO-Play device I added to the car for decent Handsfree support, this is detailed in This Thread, the boxes get hidden when the trim is replaced.
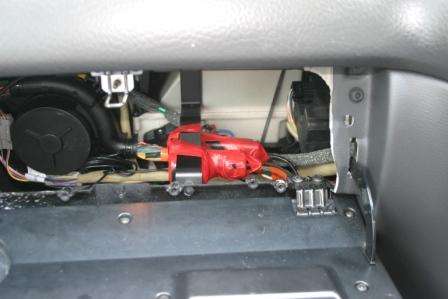
I added a new cable to the stereo during this install which adds iPOD support to the stereo, whilst I probably don't need this (yet) it saves taking the whole lot out again to add a simple cable, this is nothing to do with the TomTom but adds iPOD input to the stereo and offers full control of a device plugged in to it. I decided against using this with the iPhone as I have a Bluetooth module for that which negates the need for cables.

All cabled up and working - Oh look no wires and remember this includes an RDS-TMC receiver, much neater even though it did take a few hours.
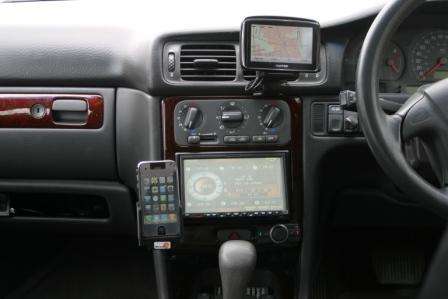
With the 940 off its bracket all that is left is a simple shoe that is pre-wired and ready to go once the device is dropped in to position.

The iPhone holder also attracts less attention as there are no tell tale wires going to it strewn all over the car.
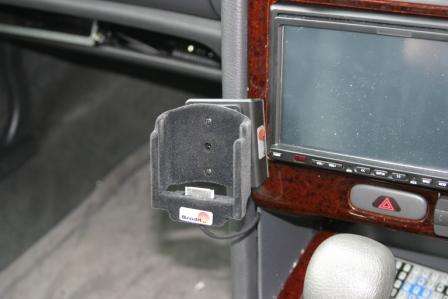
Next job is to vac out the inside of the car, bits of black plastic dust have got all over from the cutting job, but overall I am happy with the installation and the flexibility I get from the kit - Mike
I have included the following to give you a few ideas as you could apply the same aproach to the x20 unit with a little out of the box thinking, but my current set up is as follows (although this is about to change as I want to mount the TomTom iPhone car kit on a brodit pro-clip in the car and hard wire that in, this bits I need are currently on order) - I appreciate the steering wheel is on the "wrong side" for all you American chaps but left hand drive brackets are also available:
Having removed the central air vent from the car I set to with a Dremel to cut a small access hole for the cables that were going to the 940, in this case the power lead, audio line out and the RDS-TMC round style plug

The three cables are easily fed through the newly made hole, any V70 owners should note the area I cut through is doubled skinned so you need to make two cuts and if you remove the Climatic Control Panel do not disconnect it or the car will throw an airbag fault.

Feeding the cables through the airvent was good fun, in the end I took the vent to bits and put the cables through where I needed them before reassembling the vent afterwards, fiddly but not impossible, the trick is to only put the power cable through one opening and the othe other two cables through an adjacent vent hole. Doing this lets the airvent still operate correctly and spreads the cables ready to connect to the 940 mount.

As I had most of the dash trim out of the car for access and I hate wires in the car I decided to sort out the iPhone cables at the same time, the power connector for the iPhone is easily removed from the Brodit holder by releasing the two screws on the rear of the phone holder, this makes it much easier to push the cable with connector through any available gaps in the trim.

Push the connector back in to position within the Brodit mount then resecure using the closure plate and two screws.

Resecure the Brodit Active holder to the swivel coupling by tightening the center screw, only finger tight is needed though, any more than this will snap the plastic on one part of the ball joint.

I pulled out the stereo to gain access to certain connections, firstly the RDS-TMC receiver needed connecting to the car aerial cable via a splitter cable I made a while ago (detailed in This Thread).

I was also fitting a three way 12V outlet socket to power the TomTom charger and iPhone power addaptor, the feeded wires to this were simply tagged to the stereo ignition switched power wires using Scotch locks.

At this point its worth checking the power is working correctly so I switched it all on and got indications of charge for both the 940 and the iPhone so it was time to start tidying up.

Before burying all of this I taped up the power addaptors so they couldn't migrate out of the sockets due to vibration and/ or thermal creep - easy to do just bind them together with PVC tape.

The power addaptor was then secured to the underside of the glovebox support bracket with more tape, it looks a little unsightly but once the cars back together non of this will be seen. The orange boxes are part of the iO-Play device I added to the car for decent Handsfree support, this is detailed in This Thread, the boxes get hidden when the trim is replaced.

I added a new cable to the stereo during this install which adds iPOD support to the stereo, whilst I probably don't need this (yet) it saves taking the whole lot out again to add a simple cable, this is nothing to do with the TomTom but adds iPOD input to the stereo and offers full control of a device plugged in to it. I decided against using this with the iPhone as I have a Bluetooth module for that which negates the need for cables.

All cabled up and working - Oh look no wires and remember this includes an RDS-TMC receiver, much neater even though it did take a few hours.

With the 940 off its bracket all that is left is a simple shoe that is pre-wired and ready to go once the device is dropped in to position.

The iPhone holder also attracts less attention as there are no tell tale wires going to it strewn all over the car.

Next job is to vac out the inside of the car, bits of black plastic dust have got all over from the cutting job, but overall I am happy with the installation and the flexibility I get from the kit - Mike
dhn
Moderator
You're a bloody wiring genius, Mike, and provide a most useful service to members here with your various pics/descriptions.
Thanks!!!
Thanks!!!
If it helps one or two others to achieve a neat install in their car then its worth the effort, I never fit anything to the car that is GPS/ tech related without the camera in tow, perhaps one day I should write up the entire install that I have done to the Ovlov V70 in a single thread, as the car lights up like the preverbial Christmas tree if you scan for Bluetooth devices when everything is powered up! - Keeps me happy though and when I get the Brodit bits to modify the iPhone car kit I will be even happier but I doubt that will get added until the Christmas break! - Mike
Fantastic information! I also tend to modify my equipment to better fit my purpose (what can I say, I'm cheap.) so this gives a wealth of useful information. My Audi A3 has a large empty area down at the base of the dash/console that might work well with a simple mount of the home dock. the mount would not be visible if the TomTom isn't in it, and even if it is, then it's likely to look like an in-dash install.
I was also thinking about modifying the dock to allow pass-through of the RDS-TMC plug, but my first option is to use the new USB RDS-TMC receiver, which would let me get by with just the existing USB connector on the dock. I've already put a power plug in the back of the space, and I plan to follow your RDS-TMC cable instructions to wire into the radio antenna. I already checked, and I definitely need the capacitor since one of the diversity antennas is live at 12v.
Thanks everyone! Don't you love forums?
- Joined
- Mar 18, 2009
- Messages
- 13
I've been toying with the idea for some time. Put the whole project on hold because I am limited by vertical space. Would work GREAT for me if I wanted a manual solution, but I want a servo controlled solution, and that dock does not swivel as well as it could given my physical restraints.
ANYWAYS!
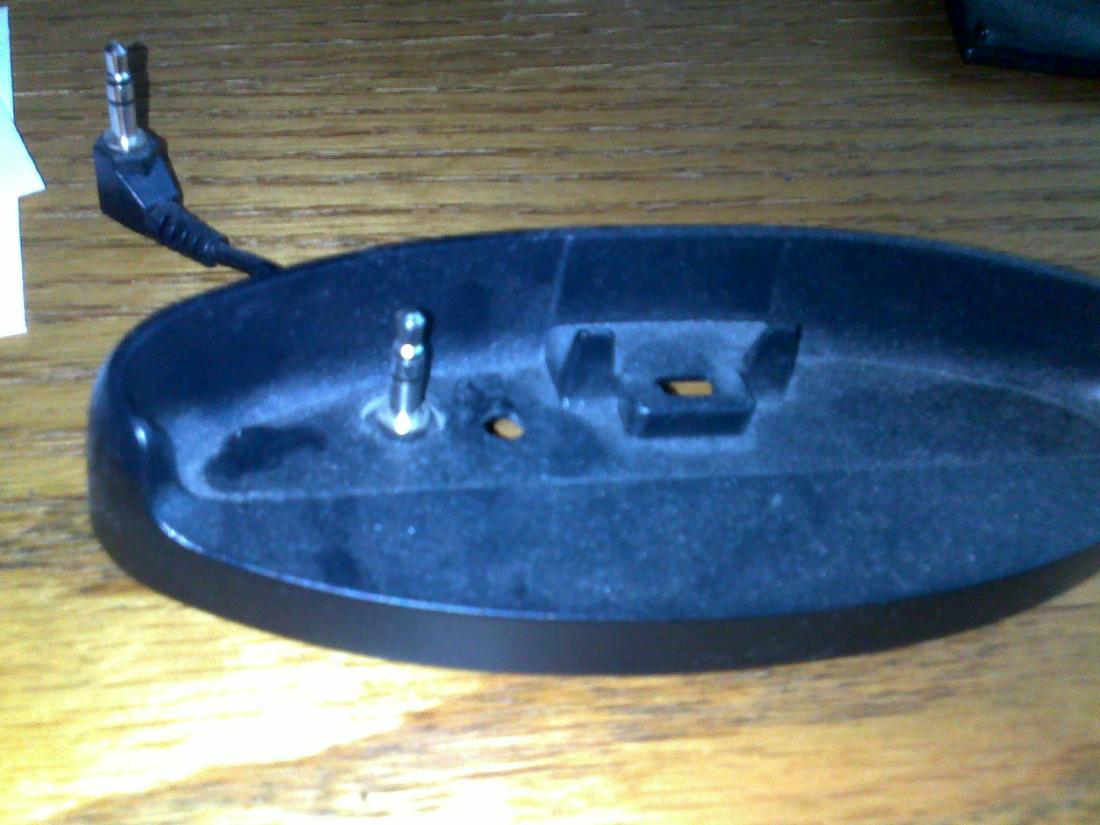
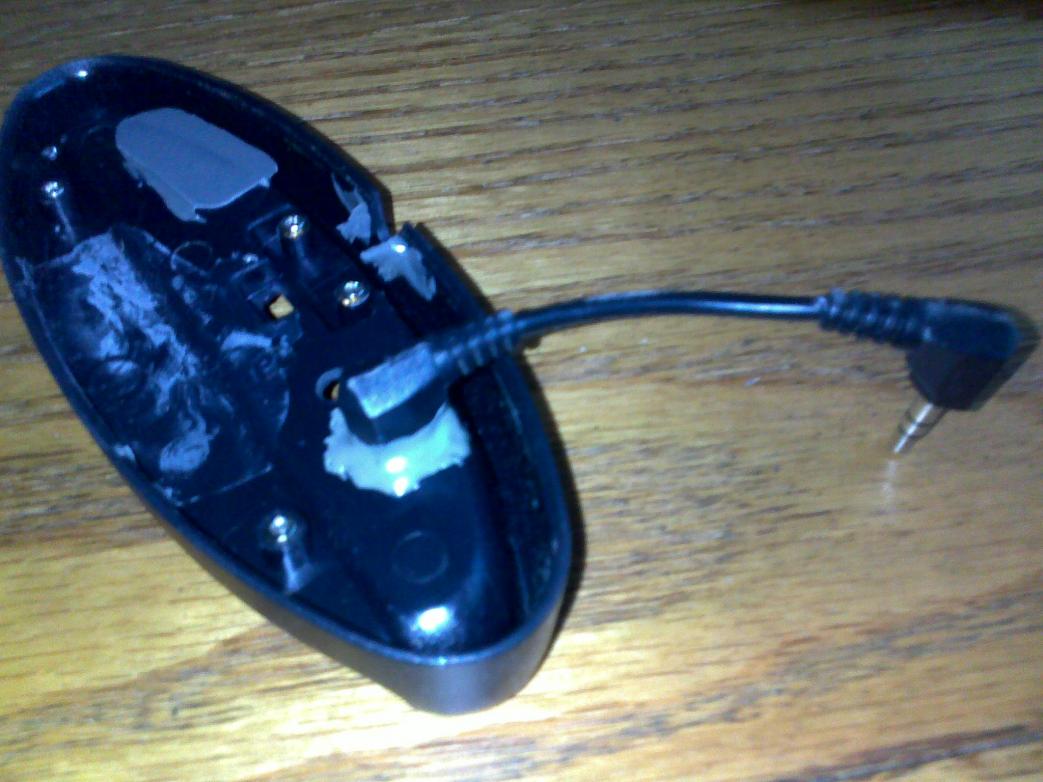
I found 90 degree plugs and drilled a hole dead nuts where I needed it to be. The friction fit is good, but not good enough. So I filled the space with JB weld. This works very, very well.
I have the iPod hole marked out but since Circuit City closed down I can't find a place that carries the eclipse iPod cable when I am motivated to buy one. So that will happen when I get the cable. For now, this piece will sit on the desk as is.
At least till I figure out a good way to set up the mechanics.
Attachments
Ask a Question
Want to reply to this thread or ask your own question?
You'll need to choose a username for the site, which only take a couple of moments. After that, you can post your question and our members will help you out.
Staff online
-
candersonModerator
Forum statistics
Latest Threads
-
Rider 400 and later Mount dock teardown
- Started by hipponax1973
-
Voices and Voice volume
- Started by wheresduke
-
Tomtom 550 problems
- Started by kimvandenberg
-
Speed camera update wont go away !
- Started by Mcbean
-
Finding POI along route
- Started by outdoor
-
Latest update puts chosen waypoint off the road
- Started by Abbienormal
-
TOMTOM 550 Rider Bluetooth or Wireless
- Started by hipponax1973
-
How do I download routes sent to me by another TomTom user?
- Started by Grinch76
-
Anyone else noticing how many of the old Easyport mounts are failing?
- Started by LukeDavis
-
Device compatibility
- Started by trackereks


